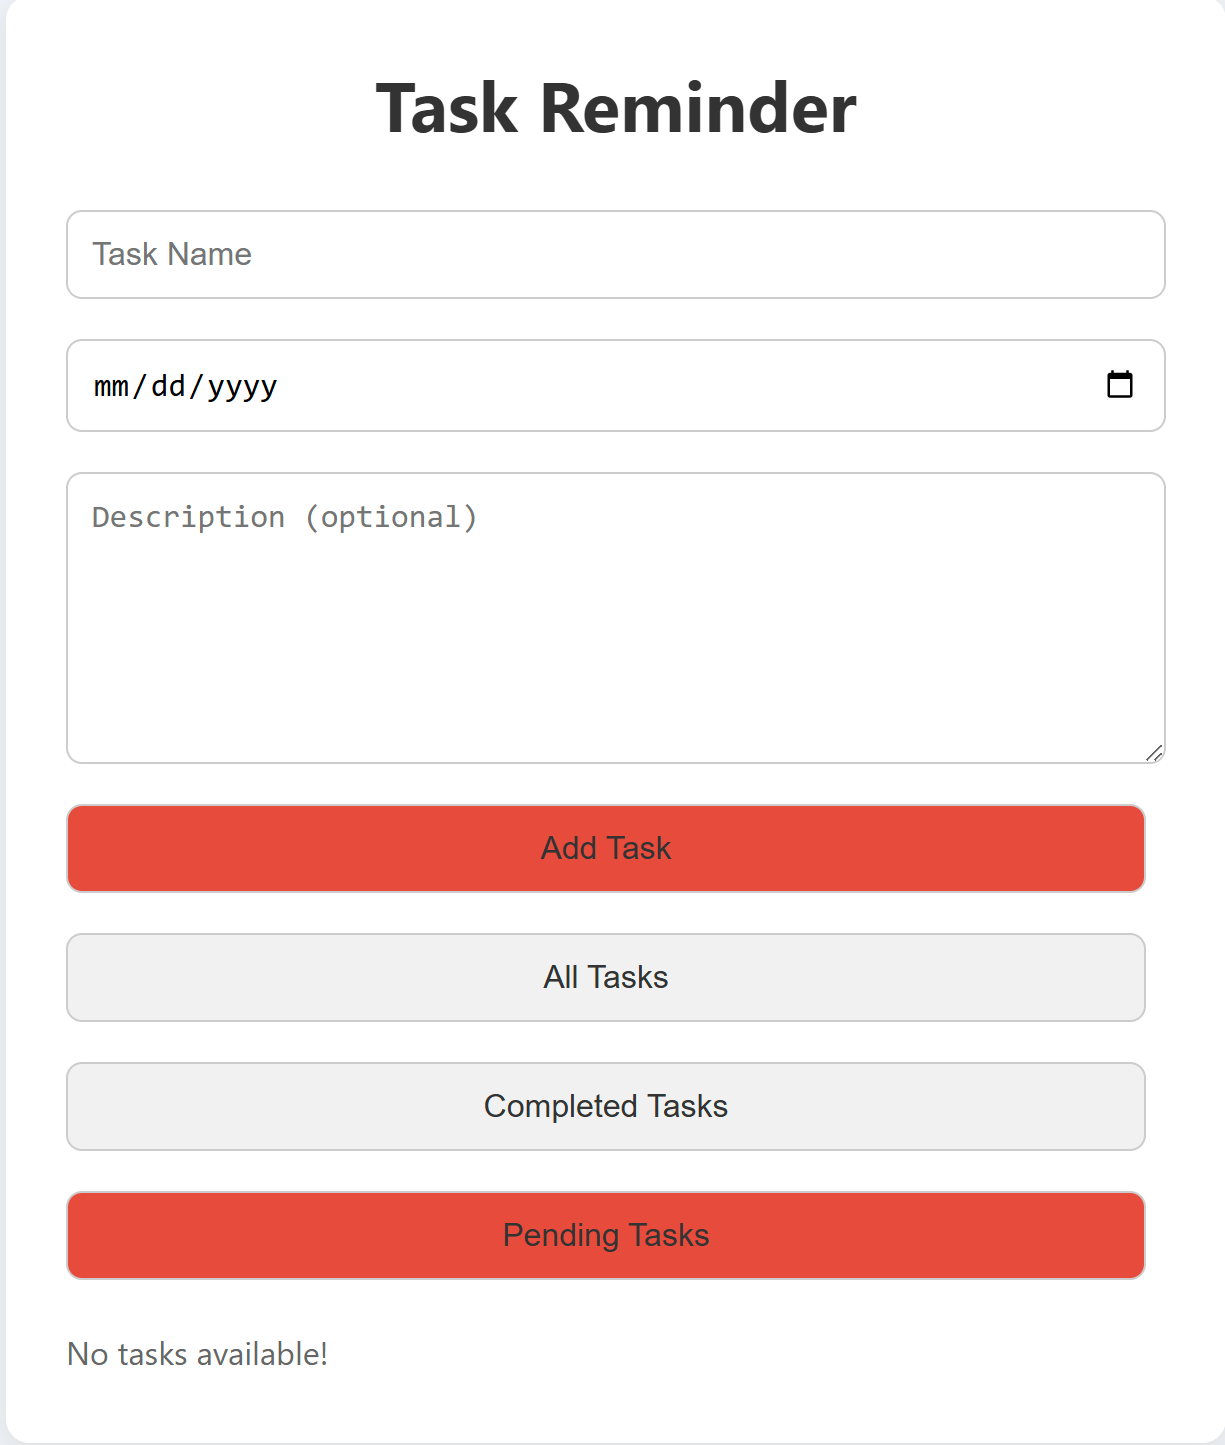
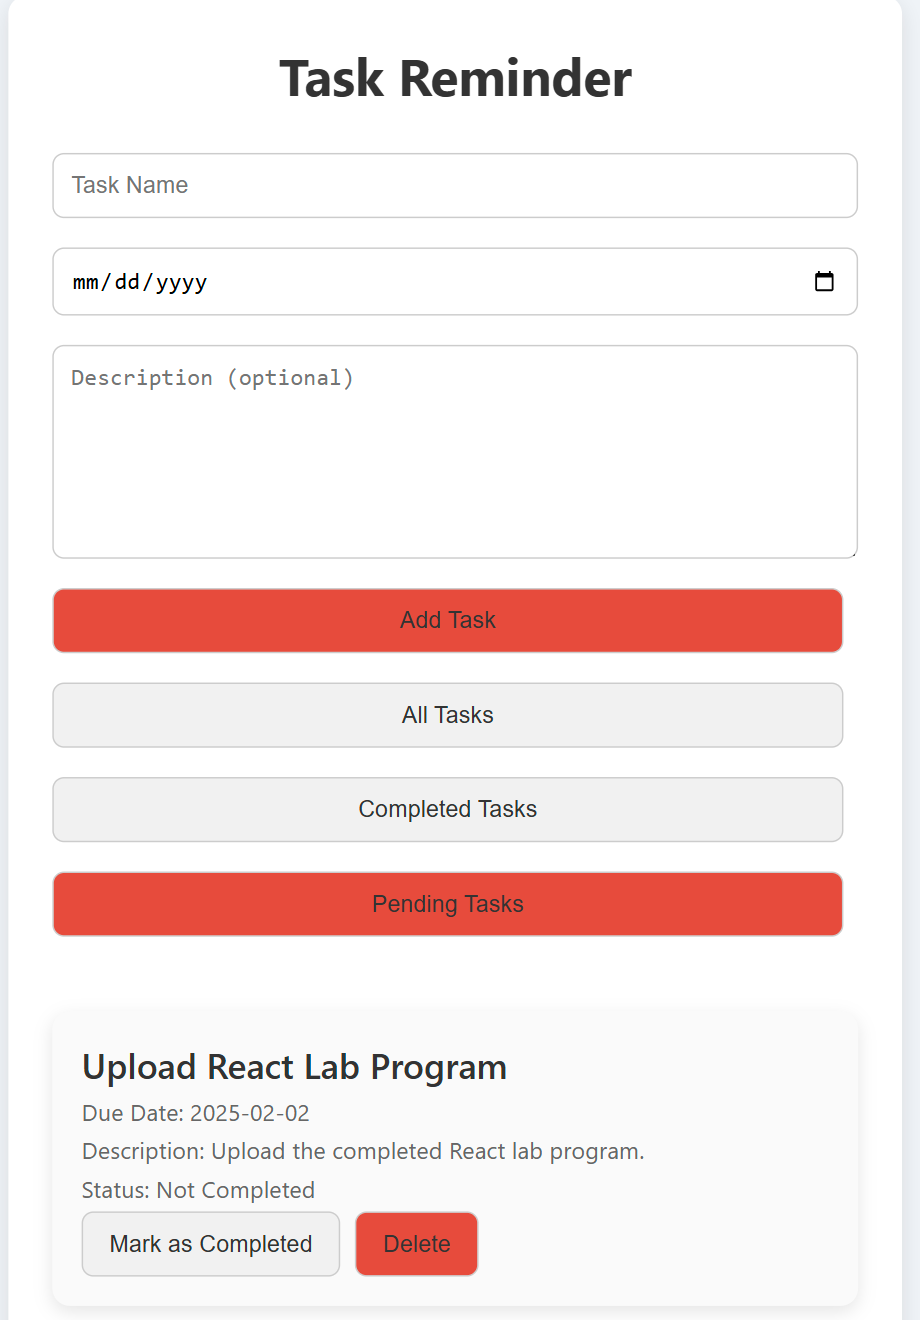
8. Develop a Reminder Application that allows users to efficiently manage their tasks. The application should include the following functionalities: Provide a form where users can add tasks along with due dates. The form includes task name, Due date, An optional description. Display a list of tasks dynamically as they are added. Show relevant details like task name, due date, and completion status. Include a filter option to allow users to view all Tasks and Display all tasks regardless of status. Show only tasks marked as completed. Show only tasks that are not yet completed.
Step 1: Create a New React Application
First, you need to create a new React app using below command. Open your terminal and run:
npx create-react-app react-reminder-appThis will set up a new React project in a folder called react-reminder-app. After the installation is complete, navigate to the project directory:
cd react-reminder-appStep 2: Set Up the Folder Structure
Create the folder structure. Here’s how you can organize the directories:
- Inside the
srcfolder:- Create a
componentsfolder. - Inside
components, createFilter.js,TaskForm.jsandTaskList.jsfiles. Copy below code and paste it into the different files.
- Create a
TaskForm.js:
import React, { useState } from 'react';

function TaskForm({ addTask }) {
  const [taskName, setTaskName] = useState('');
  const [dueDate, setDueDate] = useState('');
  const [description, setDescription] = useState('');

  const handleSubmit = (e) => {
    e.preventDefault();

    if (taskName && dueDate) {
      const newTask = {
        id: Date.now(),
        name: taskName,
        dueDate: dueDate,
        description,
        completed: false,
      };
      addTask(newTask);

      setTaskName('');
      setDueDate('');
      setDescription('');
    }
  };

  return (
    <form onSubmit={handleSubmit}>
      <div>
        <input
          type="text"
          placeholder="Task Name"
          value={taskName}
          onChange={(e) => setTaskName(e.target.value)}
        />
      </div>
      <div>
        <input
          type="date"
          value={dueDate}
          onChange={(e) => setDueDate(e.target.value)}
        />
      </div>
      <div>
        <textarea
          placeholder="Description (optional)"
          value={description}
          onChange={(e) => setDescription(e.target.value)}
        />
      </div>
      <button type="submit">Add Task</button>
    </form>
  );
}

export default TaskForm;Filter.js:
import React from 'react';

function Filter({ setFilter }) {
  return (
    <div>
      <button onClick={() => setFilter('all')}>All Tasks</button>
      <button onClick={() => setFilter('completed')}>Completed Tasks</button>
      <button onClick={() => setFilter('not-completed')}>Pending Tasks</button>
    </div>
  );
}

export default Filter;
TaskList.js
import React from 'react';

function TaskList({ tasks, setTasks }) {
  const toggleTaskCompletion = (taskId) => {
    setTasks(
      tasks.map((task) =>
        task.id === taskId ? { ...task, completed: !task.completed } : task
      )
    );
  };

  const deleteTask = (taskId) => {
    setTasks(tasks.filter((task) => task.id !== taskId));
  };

  return (
    <div>
      {tasks.length > 0 ? (
        <ul>
          {tasks.map((task) => (
            <li key={task.id}>
              <h3>{task.name}</h3>
              <p>Due Date: {task.dueDate}</p>
              {task.description && <p>Description: {task.description}</p>}
              <p>Status: {task.completed ? 'Completed' : 'Not Completed'}</p>
              <button onClick={() => toggleTaskCompletion(task.id)}>
                {task.completed ? 'Mark as Not Completed' : 'Mark as Completed'}
              </button>
              <button onClick={() => deleteTask(task.id)}>Delete</button>
            </li>
          ))}
        </ul>
      ) : (
        <p>No tasks available!</p>
      )}
    </div>
  );
}

export default TaskList;
Step 3. App Component(src/App.js):
In your src/App.js, import the Filter.js, TaskForm.js and TaskList.js
import React, { useState } from 'react';
import TaskForm from './components/TaskForm';
import TaskList from './components/TaskList';
import Filter from './components/Filter';
import './App.css';

function App() {
  const [tasks, setTasks] = useState([]);
  const [filter, setFilter] = useState('all');

  const addTask = (task) => {
    setTasks([...tasks, task]);
  };

  const handleFilterChange = (status) => {
    setFilter(status);
  };

  const filteredTasks = tasks.filter((task) => {
    if (filter === 'completed') return task.completed;
    if (filter === 'not-completed') return !task.completed;
    return true;
  });

  return (
    <div className="App">
      <h1>Task Reminder</h1>
      <TaskForm addTask={addTask} />
      <Filter setFilter={handleFilterChange} />
      <TaskList tasks={filteredTasks} setTasks={setTasks} />
    </div>
  );
}

export default App;
Step 4: Add Styles(src/App.css)
Add some styles in src/App.css to make the layout nicer. Copy the below code and paste it into the App.css file.
body {
  font-family: 'Segoe UI', Tahoma, Geneva, Verdana, sans-serif;
  margin: 0;
  padding: 0;
  background-color: #f0f4f8;
  display: flex;
  justify-content: center;
  align-items: center;
  min-height: 100vh;
}

.App {
  width: 550px;
  padding: 30px;
  background-color: #ffffff;
  border-radius: 12px;
  box-shadow: 0 4px 16px rgba(0, 0, 0, 0.1);
  transition: transform 0.3s ease, box-shadow 0.3s ease;
}

.App:hover {
  transform: translateY(-5px);
  box-shadow: 0 8px 24px rgba(0, 0, 0, 0.2);
}

h1 {
  font-size: 2.2rem;
  color: #333;
  text-align: center;
  margin-bottom: 10px;
  margin-top: 0;
}

form {
  display: flex;
  flex-direction: column;
  gap: 20px;
}

input,
textarea {
  padding: 12px;
  font-size: 1rem;
  border: 1px solid #ccc;
  border-radius: 8px;
  transition: border-color 0.3s ease;
}

input:focus,
textarea:focus {
  border-color: #4CAF50;
  outline: none;
}

button {
  background-color: #4CAF50;
  color: white;
  border: none;
  padding: 12px;
  font-size: 1rem;
  border-radius: 8px;
  cursor: pointer;
  transition: background-color 0.3s ease, transform 0.3s ease;
}

button:hover {
  background-color: #45a049;
}

button:active {
  transform: scale(0.98);
}

textarea {
  resize: vertical;
  min-height: 120px;
}

input[type="date"] {
  padding: 12px;
}

div {
  display: flex;
  flex-direction: column;
  gap: 10px;
}

ul {
  list-style-type: none;
  padding: 0;
}

li {
  background-color: #fafafa;
  margin: 15px 0;
  padding: 20px;
  border-radius: 12px;
  box-shadow: 0 4px 12px rgba(0, 0, 0, 0.1);
  transition: transform 0.3s ease, box-shadow 0.3s ease;
}

li:hover {
  transform: translateY(-5px);
  box-shadow: 0 8px 20px rgba(0, 0, 0, 0.2);
}

h3 {
  margin: 0;
  font-size: 1.5rem;
  color: #333;
  font-weight: 600;
}

p {
  margin: 5px 0;
  color: #666;
}

button {
  background-color: #007BFF;
  color: white;
  border: none;
  padding: 8px 15px;
  font-size: 1rem;
  border-radius: 8px;
  cursor: pointer;
  transition: background-color 0.3s ease, transform 0.3s ease;
  margin-right: 10px;
}

button:hover {
  background-color: #0056b3;
}

button:active {
  background-color: #003f8d;
}

button:last-child {
  background-color: #e74c3c;
}

button:last-child:hover {
  background-color: #c0392b;
}

button:last-child:active {
  background-color: #7f1c1c;
}

.completed {
  text-decoration: line-through;
  color: #bbb;
}


div {
  display: flex;
  gap: 20px;
  justify-content: center;
}

button {
  background-color: #f1f1f1;
  color: #333;
  padding: 12px 18px;
  font-size: 1rem;
  border: 1px solid #ccc;
  border-radius: 8px;
  cursor: pointer;
  transition: background-color 0.3s ease, transform 0.3s ease;
}

button:hover {
  background-color: #ddd;
}

button:active {
  transform: scale(0.98);
}

button:focus {
  outline: none;
  border-color: #007BFF;
  }
Step 5: Run the application
- In the terminal inside VSCode, run the following command to start the React development.
npm start- This will open your browser and navigate to
http://localhost:3000/. You should see your task reminder application up and running.
OUTPUT:


“Fixing the Module not found: Error: Can't resolve 'web-vitals' Error in React”

The error you’re seeing occurs because the web-vitals package, which is used for performance monitoring in a React app, is not installed by default in the project or has been removed. Since web-vitals is an optional package, you can safely resolve this issue by either installing the package or removing the code that imports it.
Option 1: Install the web-vitals package
If you want to keep the performance monitoring functionality and resolve the error, simply install the web-vitals package.
- In the terminal, navigate to your project folder (if not already there):
cd react-reminder-app- Install
web-vitalsby running the following command:
npm install web-vitals- After installation is complete, restart the development server:
npm startThis should resolve the error, and your application should compile correctly.
Option 2: Remove the Web Vitals Code (If Not Needed)
If you don’t need performance monitoring and want to get rid of the error, you can safely remove the import and usage of web-vitals from your code.
- Open
src/reportWebVitals.jsand remove its contents or just comment out the code:
// import { reportWebVitals } from './reportWebVitals';

// You can safely remove the call to reportWebVitals or leave it commented out
// reportWebVitals();- Save the file, and the application should compile without the error. You can now continue developing your app.

very good
useful